%201.svg)


How Do Painters Achieve Clean Lines When Painting Trim?
How Do Painters Achieve Clean Lines When Painting Trim?
If you’ve ever asked how do painters achieve clean lines when painting trim, you’re not alone. Clean paint lines are one of the biggest challenges in any painting job. Whether you’re working around baseboards, a ceiling, or a tight corner, getting a straight line takes more than just a steady hand. It takes preparation, the right tools, and a consistent method. In any room, the way trim meets the wall or ceiling can make or break the final look. Professional painters focus on process so every line looks intentional, sharp, and clean.
Here’s the Quick Answer
Professional painters achieve clean paint lines by preparing the surface, using a high-quality angled brush, controlling how much paint is applied, and using painters tape only when needed. Clean lines come from technique and control. When paint bleeds or edges look uneven, it usually comes down to too much paint, poor prep, or rushing through the job.
Why Clean Paint Lines Matter More Than You Think
Clean paint lines define how finished a room feels. When trim meets wall color, the line should be straight and consistent. Straight lines along baseboards, ceiling edges, and every corner help create a polished look. If the line is off, the entire space can feel unfinished. Clean lines also improve how well paint holds up over time. When paint is applied correctly along each edge, it bonds better to the surface and reduces peeling.
Step 1 | Surface Preparation Is What Makes or Breaks the Line
Proper preparation is just as important on a full-room or whole-house project as it is on a single piece of trim, and many of the same cleaning, masking, and repair steps apply when you’re prepping a house for painting day.
Cleaning and Preparing the Surface
Every clean line starts with a clean surface. Dust, grease, and debris on wood, drywall, or trim will lead to bleeding paint. Before you start painting, wipe everything down with a damp rag. This helps the paint stick and reduces issues later in the job.
Sealing Gaps to Create a Continuous Edge
Gaps between baseboards and wall surfaces allow paint to seep through and create uneven lines. Caulking these gaps helps seal the edge and creates a smooth transition. This is a simple step that helps prevent bleeding and improves the final result.
Sanding for a Smooth Finish
A smooth surface is key to clean paint lines. Sanding removes rough spots and helps each coat of paint go on evenly. Between coats, a light sanding keeps everything consistent.
Priming When Needed
If you’re working with raw wood or repaired drywall, primer helps create a uniform surface. This allows the first coat and second coat to go on evenly without uneven color or absorption.
Step 2 | The Professional Technique: Cutting In
What Cutting In Means
Cutting in is the method used to create a straight line along trim without relying completely on tape. It involves guiding the paint brush carefully along the edge where trim meets wall or ceiling.
Using the Right Brush
An angled brush is the best tool for this work. The angled brush gives you more control and helps create a straight edge. A high-quality paint brush also holds paint better and releases it evenly, just like choosing the best interior paint for your space helps the finish level out and stay durable.
How to Load the Brush
Dip the brush about one third into the paint, then tap off excess. Too much paint leads to drips and makes it harder to keep the line straight.
Creating Straight Lines with Each Stroke
Use long, smooth strokes with a steady hand. Keep your focus on the edge and guide the brush carefully. This technique helps create clean paint lines without relying too much on tape.
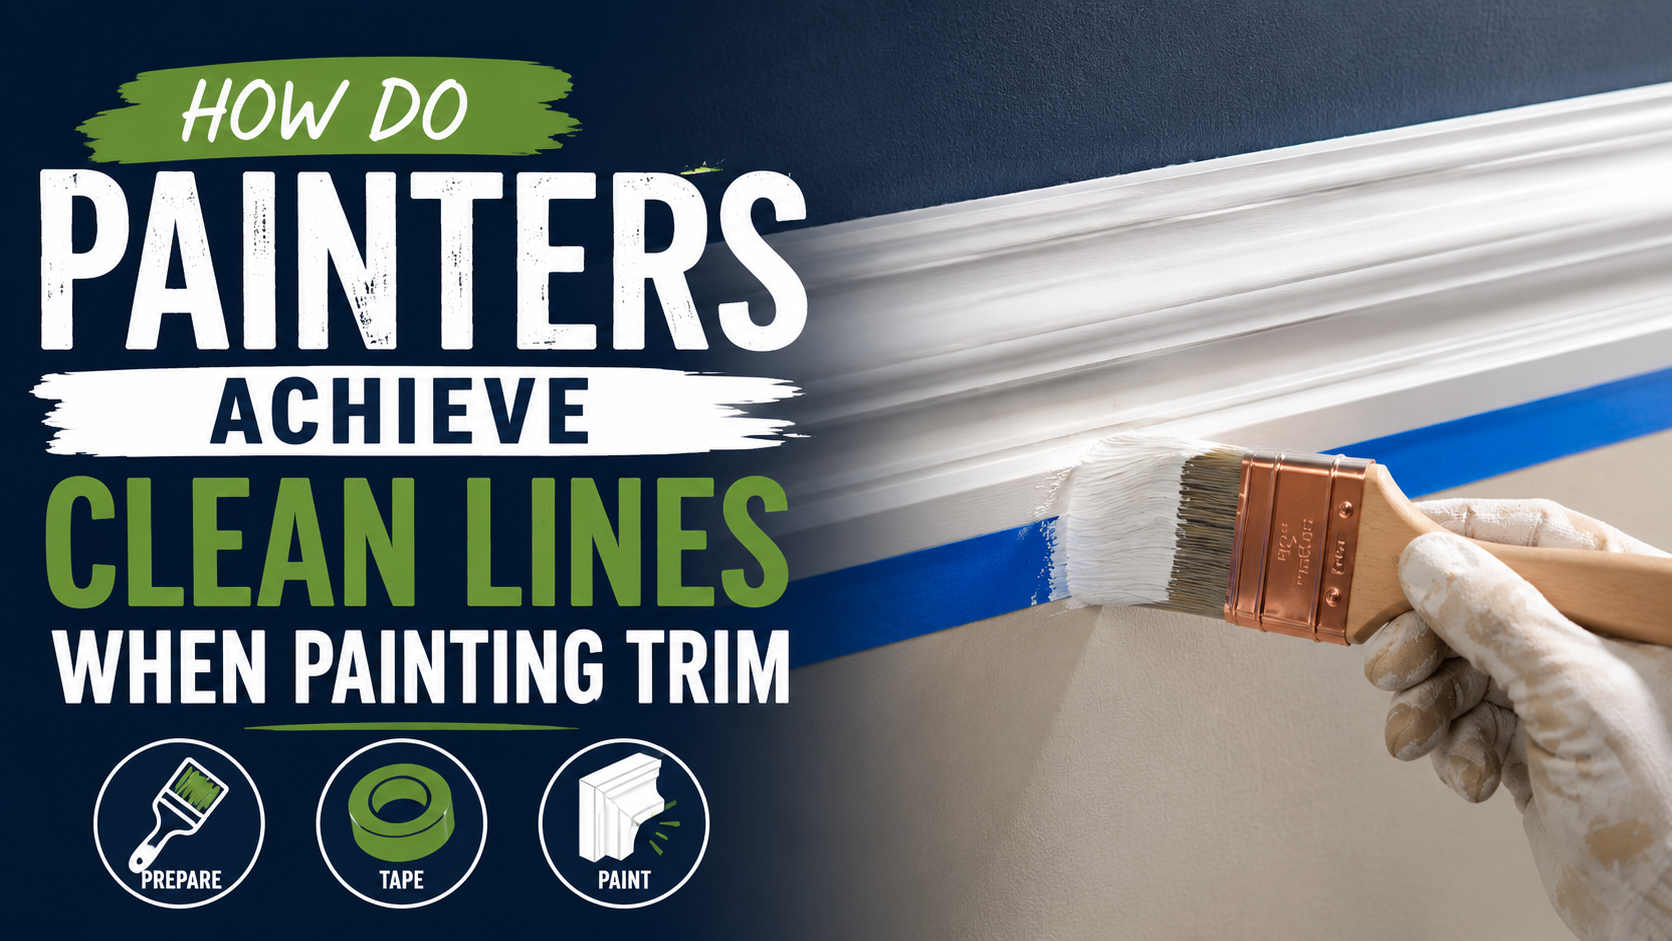
Step 3 | When and How to Use Painters Tape the Right Way
When Tape Helps
Painters tape is useful in certain situations, especially when working with textured drywall or strong contrast like white paint next to black paint. It can help create straight lines when used correctly.
Why Tape Alone Is Not Enough
Tape does not automatically create clean lines. If the tape edge is not sealed, paint bleeds underneath. Many DIY painters rely too heavily on tape instead of focusing on technique.
Choosing the Right Tape
There are several types of tape available:
- Blue tape is commonly used and works well for general painting tasks.
- Frog tape is designed to seal edges and reduce bleeding, making it a strong option for clean paint lines.
- Masking tape can be used, but it is less precise than painters tape and frog tape.
Using the right tape matters, especially when working on detailed trim.
How to Apply Tape Correctly
Apply tape firmly along the edge and press it down so it sticks fully to the surface. Use your finger to press the tape line into place. This helps prevent paint bleeds and keeps the line straight.
Sealing the Tape Edge
To seal the tape edge, apply a thin coat of the base color first. This fills any small gaps. Once that dries, apply your new color. This extra step helps create crisp lines and prevents bleeding paint.
Removing Tape Without Damage
Remove the tape while the paint is still wet or slightly soft. Pulling the tape back slowly at an angle helps keep the line straight and prevents tearing.
Step 4 | Controlling the Paint for a Sharp Finish
Avoiding Too Much Paint
Too much paint causes drips and uneven edges. Apply a thin coat instead of a thick one to prevent drips and maintain control.
Maintaining Brush Control
Control is key to clean lines. Keep steady pressure on the brush and move at a consistent speed. This helps keep the line straight and smooth.
Working in Sections
Work in small sections to maintain control. This also helps you keep a wet edge, which is important for blending.
Letting Paint Settle Naturally
Do not overwork the paint. Let it settle and level out naturally. This helps create smooth, clean paint lines.
Step 5 | Maintaining a Wet Edge for Seamless Results
What a Wet Edge Means
A wet edge means continuing to paint while the previous section is still wet. This allows each stroke to blend into the next.
Why It Matters
If paint dries between sections, you will see uneven lines and lap marks. Keeping a wet edge helps create a smooth finish.
Managing Timing
Plan your work so each section stays wet. This is especially important when working along a ceiling or long wall.
Step 6 | Using the Right Tools for the Job
Brush and Tool Selection
High-quality tools help create better results. A good angled brush gives you control and helps create clean lines. Cheap tools can make it harder to maintain a straight edge, and the same focus on quality shows up in how professional painters specify prep, materials, and tools in their painting contracts and scope of work.
Tape Options and Performance
Frog tape is often preferred for reducing bleeding. Blue tape is a reliable option for general use. Masking tape can still work, but it may not provide the same level of precision.
Using Rollers Near Trim
A small roller can help blend the wall color into the cut line. This helps create a consistent finish across the surface.
Why Tools Matter
The right tools improve control, reduce bleeding, and help create clean paint lines more consistently.
Step 7 | The Order of Painting Matters
Planning the Workflow
Before you start painting, plan your approach. Decide whether to paint trim first or wall first. Both methods can work when done correctly.
Painting Trim and Walls
Many professionals paint trim first, then cut in the wall color. Others reverse the order. The key is consistency and planning.
Working Around Corners and Edges
Corners require extra attention. Take your time in each corner to keep the line straight and avoid mistakes.
Common Mistakes That Ruin Clean Paint Lines
- Skipping prep leads to poor adhesion and bleeding.
- Using too much paint causes drips and uneven edges.
- Relying only on tape instead of technique results in messy lines.
- Not allowing paint to dry completely between coats creates problems.
- Using worn tools makes it harder to control the brush.
Avoiding these mistakes helps create clean paint lines that last.
Can Homeowners Achieve Professional Level Clean Lines?
What Is Realistic
With patience and practice, homeowners can improve their results. Start with small areas and focus on technique.
Where DIY Goes Wrong
Most DIY issues come from rushing and skipping steps. Clean lines take time and attention.
When to Hire a Professional
For larger projects or detailed trim work, hiring a professional can save time and ensure better results.
How Cover Pro Painting Delivers Clean, Consistent Results
At Cover Pro Painting, we focus on preparation, control, and consistency on every job. We prep each surface carefully, seal edges, and use the right tools for the job. Our team uses proven technique to cut clean lines and maintain a wet edge throughout the process. From baseboards to ceiling transitions, every detail matters. That is how we consistently create clean paint lines that hold up over time.
As a residential and commercial painting company in Seattle, Cover Pro Painting brings a detailed process and long-term focus on durability to every project. Our About Cover Pro Painting page explains the craftsmanship standards and warranties that guide how we handle trim and edge work. Homeowners in the Eastside can rely on our painting company in Newcastle, WA and broader Newcastle painting contractor services for precise interior lines and weather-ready exteriors, while our Seattle painting team and Tacoma painting specialists deliver the same level of trim detail across the region, supported by dedicated interior painting services in Tacoma, WA.
If you are ready to start painting or want a professional result, schedule your service or get your quote today.
Frequently Asked Questions (FAQs)
How does latex paint affect achieving clean lines on trim?
Latex paint is commonly used for interior trim because it dries quickly and cleans up easily. However, it can sometimes bleed under tape if the edges aren't properly sealed. Using high-quality painter's tape and sealing the tape edges with the base color or caulk helps prevent bleed and ensures clean lines with latex paint.
Does tape really work for creating clean paint lines?
Yes, tape works well when applied correctly. The key trick is to press the tape firmly to create a tight seal and paint over the tape edge with the base color before applying the trim color. This method prevents paint from bleeding under the tape and results in crisp lines.
What is the best time to remove painter's tape for clean lines?
Removing painter's tape while the paint is still wet or slightly tacky is crucial for clean lines. Pull the tape back slowly at a 45-degree angle to avoid peeling paint or jagged edges.
How many coats of paint are recommended for trim?
Typically, two coats of paint provide the best coverage and finish on trim. Allow the first coat to dry completely before applying the second coat, and use the same careful taping and cutting-in techniques for each coat.
Can natural light help when painting trim for clean lines?
Yes, painting in natural light or with bright, consistent lighting helps you see the edges clearly and identify any paint bleeds or uneven lines as you work, allowing you to correct them immediately.
Is a dry brush technique useful for cutting in clean lines?
A dry brush, with minimal paint loaded, can help maintain control and reduce drips when cutting in along trim edges. This technique helps achieve sharp, clean lines without excess paint causing bleeding.
Conclusion
Achieving clean lines when painting trim is a combination of careful preparation, the right tools, and practiced technique. Using quality materials like latex paint and painter's tape—especially brands with special features like PaintBlock® technology—can make a significant difference. Proper surface cleaning, sealing tape edges, controlling paint application, and timely tape removal all contribute to sharp, professional-looking results. Whether you choose to cut in by hand or use tape, patience and attention to detail are key. With these steps and a bit of practice, anyone can master the art of clean paint lines on trim, enhancing the overall look and longevity of their paint job.