%201.svg)


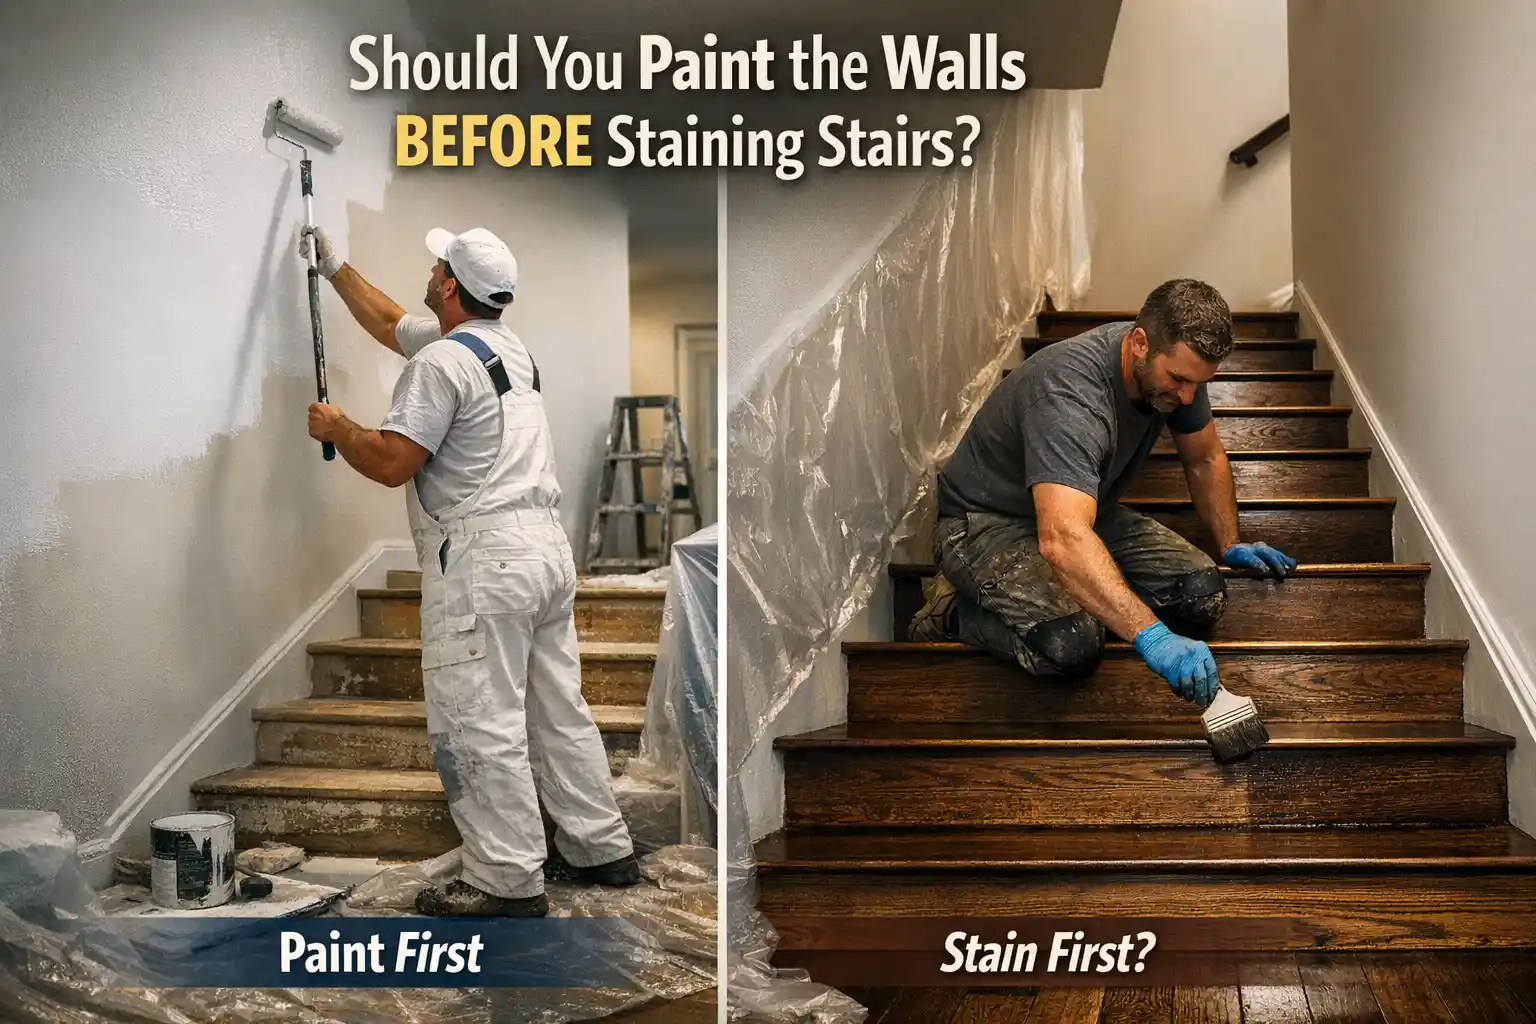
Should You Paint the Walls Before Staining Stairs? A Pro’s Guide to Getting the Sequence Right
Key Takeaway:
Yes, paint the walls before staining stairs. Painting walls first keeps dust, paint drips, and sanding from ruining your stained treads and ensures a cleaner, longer-lasting finish. Professionals recommend this approach for greater protection and easier touch-ups throughout the project.
Introduction: Why Sequencing Matters in Remodels and New Construction

As any seasoned contractor or homeowner knows, small decisions in renovation can have lasting impacts. One of the most frequently debated questions in stair and wall projects is simple but crucial: should you paint the walls before staining stairs? Getting the sequence right is about more than just appearance—it's about protecting your investment, ensuring a durable finish, minimizing costly rework, and keeping your home's daily flow intact. At Cover Pro Painting, we see how these choices play out on real projects every week, whether the home is historic or new construction. The key is to factor in how
paint, stain, dust, and traffic interact on hardwood floors, wood floor treads, doors, and trim during every step of your remodel.
Common DIY and Contractor Missteps
Many well-meaning DIYers and even experienced floor guys make the mistake of staining the stairs first, only to discover later that sanding dust, paint splatters, or small chips can mar a pristine finish. Sometimes, failing to cover the entire staircase with protective coverings or drop cloths means dog hair or debris get trapped under a final coat or stain layer. Even a little sanding dust can become embedded in the wood grain, requiring additional sanding or stripping back to bare wood. Rework is time-consuming and frustrating for both contractors and homeowners. Proper sequencing prevents these headaches and keeps the project on track while ensuring your wood floor surfaces and painted white risers remain flawless.
Impact of Sequencing on Finish Quality and Timeline
The order in which you tackle painting and staining matters a lot. Paint too soon, and you’re risking paint on that bare wood or freshly stained treads. Stain too early, and you might trap dust or have to mask stairs with a tack cloth and painter's tape—a process that increases the risk of damaging your beautiful new finish. Done right, you get brilliant, clean edges and surfaces that last. Done wrong, and you’re left with touch-up work, hidden costs, or worse, having to refinish the entire staircase, including both treads and risers. The right process—painting, masking, sanding, staining, and sealing—ensures both the walls and stairs look sharp without overlapping errors.
Typical Customer Questions in the South Puget Sound
We commonly hear: “Should we paint the walls first or stain the stairs first?” “What if there are pet stains, dog hair, or rough surfaces on our wood?” “How do you keep paint off stained wood and floors?” These are smart questions. Homeowners want their investment protected, their calendar respected, and the process explained in plain language. Our detailed approach covers all the details, from masking and sanding to the timing of each coat and handling interior transitions between wood floor areas and adjoining walls.
Quick Tips: For the best results and minimal headaches, always paint the walls before staining the stairs. This standard order protects clean wood grain, saves time, and delivers a better long-term finish for every type of house.
The Standard Recommendation: Paint Walls Before Staining Stairs
The industry consensus—and Cover Pro Painting’s core workflow—is clear: paint the walls before staining stairs. The main reason is dust, but there’s more to it than that. Paint is much easier to clean off bare or finished wood than dark stain is to remove from a painted white wall or trim. Overlapping tasks, such as painting and staining, put every surface—stairs, walls, doors, trim, and floors—at risk for accidental mars, especially in active homes where families and pets walk through the space daily.
Reasons Behind Industry Preferences
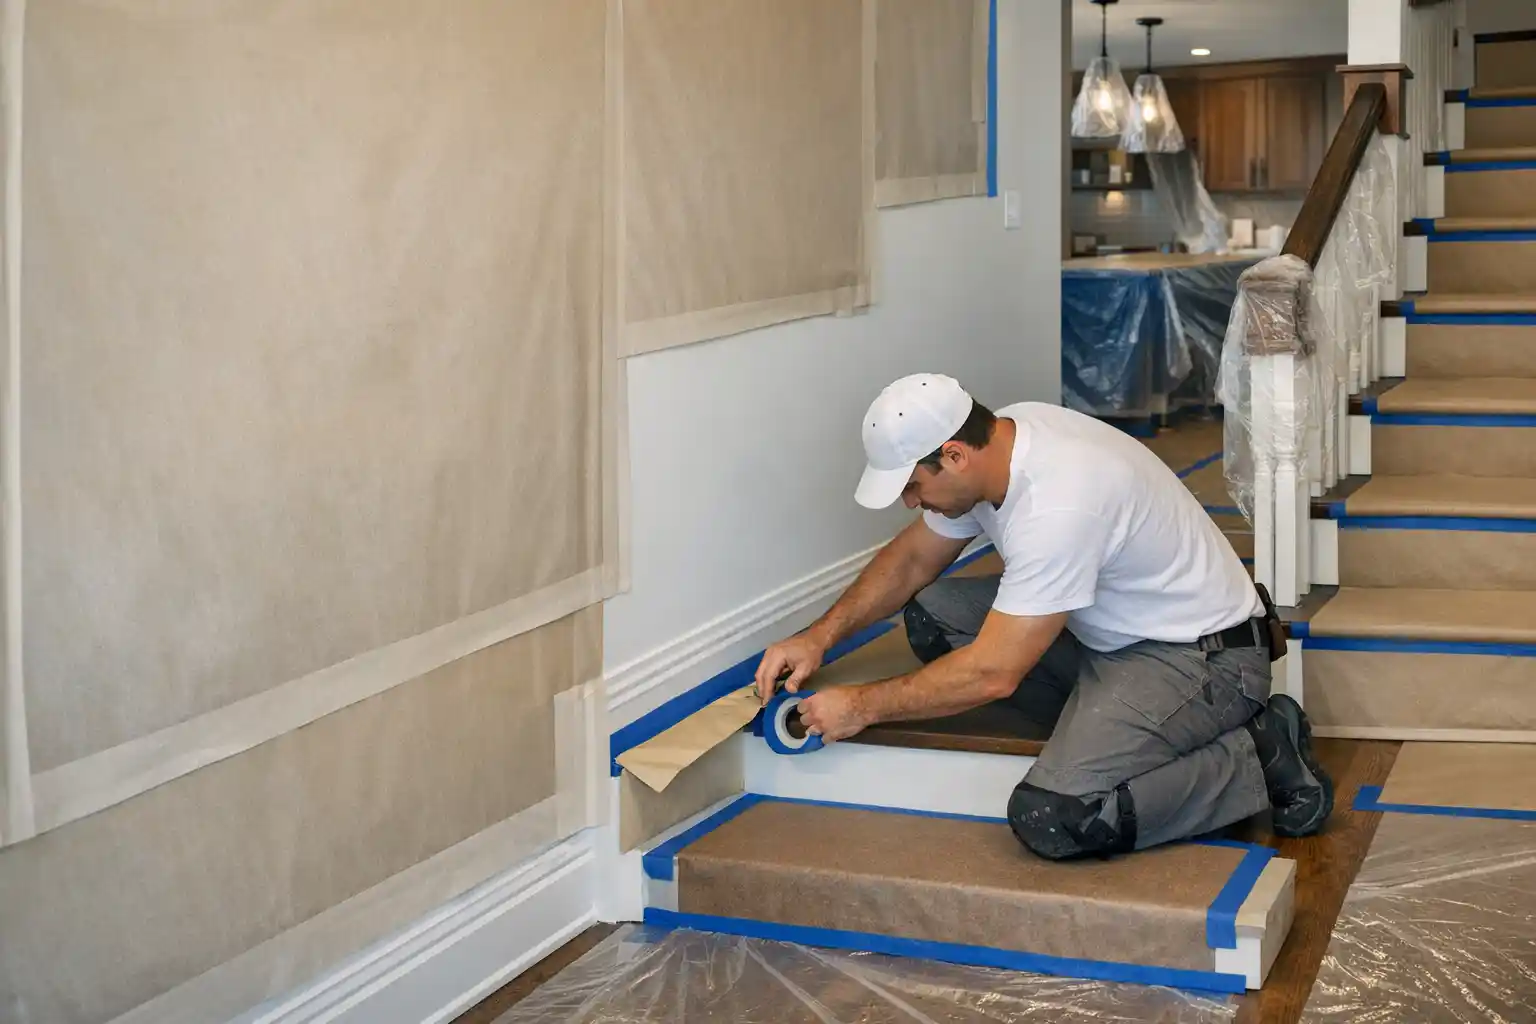
Painting walls first allows floor guys and woodworkers to inspect for rough patches, sand effectively (using fine grit sandpaper), and apply stain without worrying about damaging finished surfaces nearby. Paint also dries quicker and can be masked off with less risk to the fresh surface underneath. With quality masking—like painter’s tape, heavy drop cloths, or lint free cloth—you can easily shield treads, risers, carpet runner edges, or newly painted doors and trim during staining. Protective coverings help avoid contact between stain and delicate interiors, especially in high-traffic homes.
How Stain and Paint Behave on Different Surfaces
Stain soaks into bare wood, enhancing wood grain but clinging to any dust or paint residue nearby. If sanding dust isn't fully removed from treads or risers—whether with a tack cloth or damp cloth—your entire staircase can develop uneven coloring or texture. Paint, particularly semi gloss for walls or trim, sits atop surfaces and can be chipped or chemically altered by strong wood cleaners or oil-based stains applied too soon. Plus, sanding dust gets everywhere—it’s much easier to clean off bare hardwood floors or masked newel posts than a freshly painted surface. Ensuring each surface is properly cleaned, masked, and sealed with the right coat at each stage delivers results worth protecting.
Interior Linking: Our Full Interior Painting Process
Want to see how this fits into a whole-home project? Check out our interior painting process for detailed prep and sequencing, which covers all aspects of painting, masking, drying times, and dust control on wood floors, doors, and trim.
Quick Tips: Stain and paint have distinct drying times and cure rates; by painting walls first and staining stairs second, you minimize any overlap or accidental damage to either finish. Drying times for each coat must be respected to achieve the most resilient, beautiful surfaces.
Step-by-Step Checklist: Sequencing Walls and Stairs
Checklist for Wall Preparation and Painting First
- Remove any carpet runner, nails, or old hardware along stairs and landings. Lay protective drop cloths or masking over all the wood floor sections and treads before work starts.
- Sand rough patches and address any cracks or repairs on drywall—wipe with a tack cloth or lint free cloth to remove dust, sanding debris, and dog hair stuck to trim or the floor.
- Prime patched areas and apply coats of paint—typically two for best coverage using semi gloss or eggshell, depending on your desired finish. Carefully mask all doors, wood, and trim with painter’s tape and drop cloths for precision.
- Allow full drying times (even for quick-drying paint)—this can mean overnight or longer in humid conditions. Don’t remove masking until both coats are fully cured and no sticky residue remains on the walls or wood.
- Use painter’s tape and overlapping drop cloths to mask off the edges and any exposed wood before the next phase. Make sure protective coverings are also in place to defend the wood grain from accidental splatter or sanding dust.
Checklist for Staining Stairs After Walls
- Lightly sand all wood surfaces with fine grit sandpaper; remove every trace of sanding dust—clean with a damp cloth, then follow up with a dry lint free cloth. This is critical to ensure no dust or dog hair remains on the bare wood treads, risers, or adjacent hardwood floors.
- Apply stain evenly with staining pads or clean rags, always wiping excess to highlight wood grain. Move methodically down the staircase, working one tread and riser at a time so no area gets missed. Pay extra attention to edges near painted white risers to ensure no overlap between paint and stain.
- Allow drying times between coats. For a deep tone on hardwood floors, a second coat may be needed (test on bare wood or a hidden tread to check absorption and how the color matches the rest of the interior woodwork).
- Seal with a final coat—usually a polyurethane or conversion varnish for durability—right after the stain has cured fully. Use lint free cloth and staining pads to ensure even coverage and avoid introducing dust or dog hair in the process.
Supplies Needed for Puget Sound Homes
- Painter's tape and masking film
- High-quality drop cloths for floors, stairs, and doors
- Lint free cloth and tack cloth for prepping treads, risers, and trim
- Staining pads and fine grit sandpaper for managing all wood grain details
- Low-VOC paint, stain, and sealant for safe interior air quality
- Vacuum or dust extractor for minimizing sanding dust on wood floors and carpet runners
Quick Tips: Always test color and absorption on a spare tread or piece of trim to match stain and paint. This minimizes surprises and ensures all the details fit your vision for the entire staircase, doors, and wood floor transitions.
Dust Control and Surface Protection: Real-World Jobsite Strategies
Stair Masking Techniques to Prevent Overspray and Drips
Protecting your worksite isn’t just about aesthetics—sanding dust, dog hair, and even foot traffic can create lasting impressions (literally) on wood, walls, and flooring. We use overlapping drop cloths and floor-to-ceiling poly sheeting to contain dust effectively on both hardwood floors and carpet areas. Clean as you go: wipe, sweep, and vacuum after every sanding or staining phase. Use damp cloth and tack cloth on treads and risers before each coat. Taping every joint, trim, and edge is tedious, but it’s what separates a crisp semi gloss finish from a mediocre one. Apply painter’s tape along every line and around carpet runner edges to avoid accidental surges of stain or paint where you walk the most.
Working Around Schedules, Furniture, and Family Life
Stair projects can disrupt a house like few other jobs. Protect areas with carpet or hardwood floors—use protective coverings and coordinate schedules so families can safely walk through the interior between phases. Temporary carpet runners or taped plastic walkways keep treads and floors clean while the project advances and drying times for each coat are observed. Lay extra drop cloths and barrier tape around ALL high-traffic areas to avoid introducing new dust or stains.
Spotlight: Dust Management in Rainy/Humid Climates
Humidity means sanding dust clings longer and settles everywhere—on wood, paint, and even inside carpet runner fibers. For best results, keep air flowing, use fine HEPA vacuum filters, and allow extra time for surfaces to settle before applying stain or the second coat of paint. Wipe surfaces down with a lint free cloth prior to each application to ensure the grain of your treads or risers remains sharp and clean.
Quick Tips: Never underestimate the need for protective coverings and thorough dust control—you could save hours (and your entire staircase finish) with careful masking and clean-up before and after every coat or sanding pass.
Drying, Curing, and Timing: Adjusting for the Modern Home

Fast-Cure Technologies: Paints and Stains in 2025-2026
Today’s paints and stains cure faster and emit less odor than ever before, which makes them ideal for occupied homes. However, don’t cut corners—quick-dry doesn’t mean “walk on it in an hour.” Pay close attention to manufacturer directions, especially when layering a final coat of polyurethane on stained treads or risers. Schedule painting and staining phases so each coat—primer, first and second paint/finish coat, stain, and sealant—has its dedicated cure period. This sequence is crucial for hardwood floor and wood floor areas that see a lot of traffic or where carpet runner transitions might delay full curing.
Navigating Humidity, Temperature, and Airflow in Modern Homes
Modern HVAC and variable climate zones inside homes affect drying rates for each coat. The safest approach is to schedule work during temperate days, keep airflow moderate, and avoid introducing new dust or humidity during curing. This matters for all interior finishes—walls, stairs, doors, and adjacent hardwood floors—as differing materials (like semi gloss on trim and deep stain on treads) can react differently if not fully cured.
When to Start and How Long to Wait Between Phases
Always read product labels, but as a rule:
- Allow wall paint 24 hours to dry (longer in humid conditions); all protective coverings should remain until the final coat is hardened.
- Stains typically need 8–24 hours per coat; always check drying times for the type of wood floor or staircase you have.
- Final finishes, like a semi gloss floor varnish or polyurethane, may take 24–48 hours before you walk normally on them; lay carpet runners only after this window.
Quick Tips: When in doubt, wait an extra day before moving to the other step in your process. Rushing drying times is a top reason for peeling finishes, scuffing, embedded sanding dust, and costly rework on treads, risers, and wood floor transitions.
Damage Mitigation: What If the Sequence Gets Mixed Up?
Spot Touch-Ups for Paint and Stain
If paint drips on finished stairs or stain splatters reach painted white walls, all is not lost. Remove dry paint from stained wood by lightly sanding with fine grit sandpaper and applying a repair coat of stain. If stain gets on painted trim, use a specialty cleaner or touch-up with your wall color once the stain has fully cured. Sanding pads and lint free cloths help isolate and clean up small problem spots—never use harsh solvents that might destroy underlying finish or wood grain integrity.
Repair Protocols for Overlaps and Stains Gone Astray
Sometimes you need to go back to bare wood or reprime the area. Use drop cloths, mask off adjacent doors, trim, or carpet with painter's tape, sand as needed, then apply a fresh coat. Be patient during drying times and check results in full natural light before calling it done. Often, professional intervention delivers the best results if overlaps on wood floor, treads, or risers are extensive—especially if dust or pet hair got embedded in wet finish.
When to DIY and When to Call a Professional
Small nicks and touch-ups are usually safe for a skilled homeowner (especially on painted white trim or the outer edge of a carpet runner). For major overlap, damage, or recurring dust issues, contact Cover Pro Painting for expert repair—our experienced crew can handle all the details, from masking and sanding to stain-matching and new final coats.
Quick Tips: The best fix is prevention: mask every inch, cover all wood floor and carpet surfaces, and assign each coat its own day whenever possible. Don’t try to squeeze paint and stain stages into the same window—respect drying times and keep your protective coverings in place through the entire process.
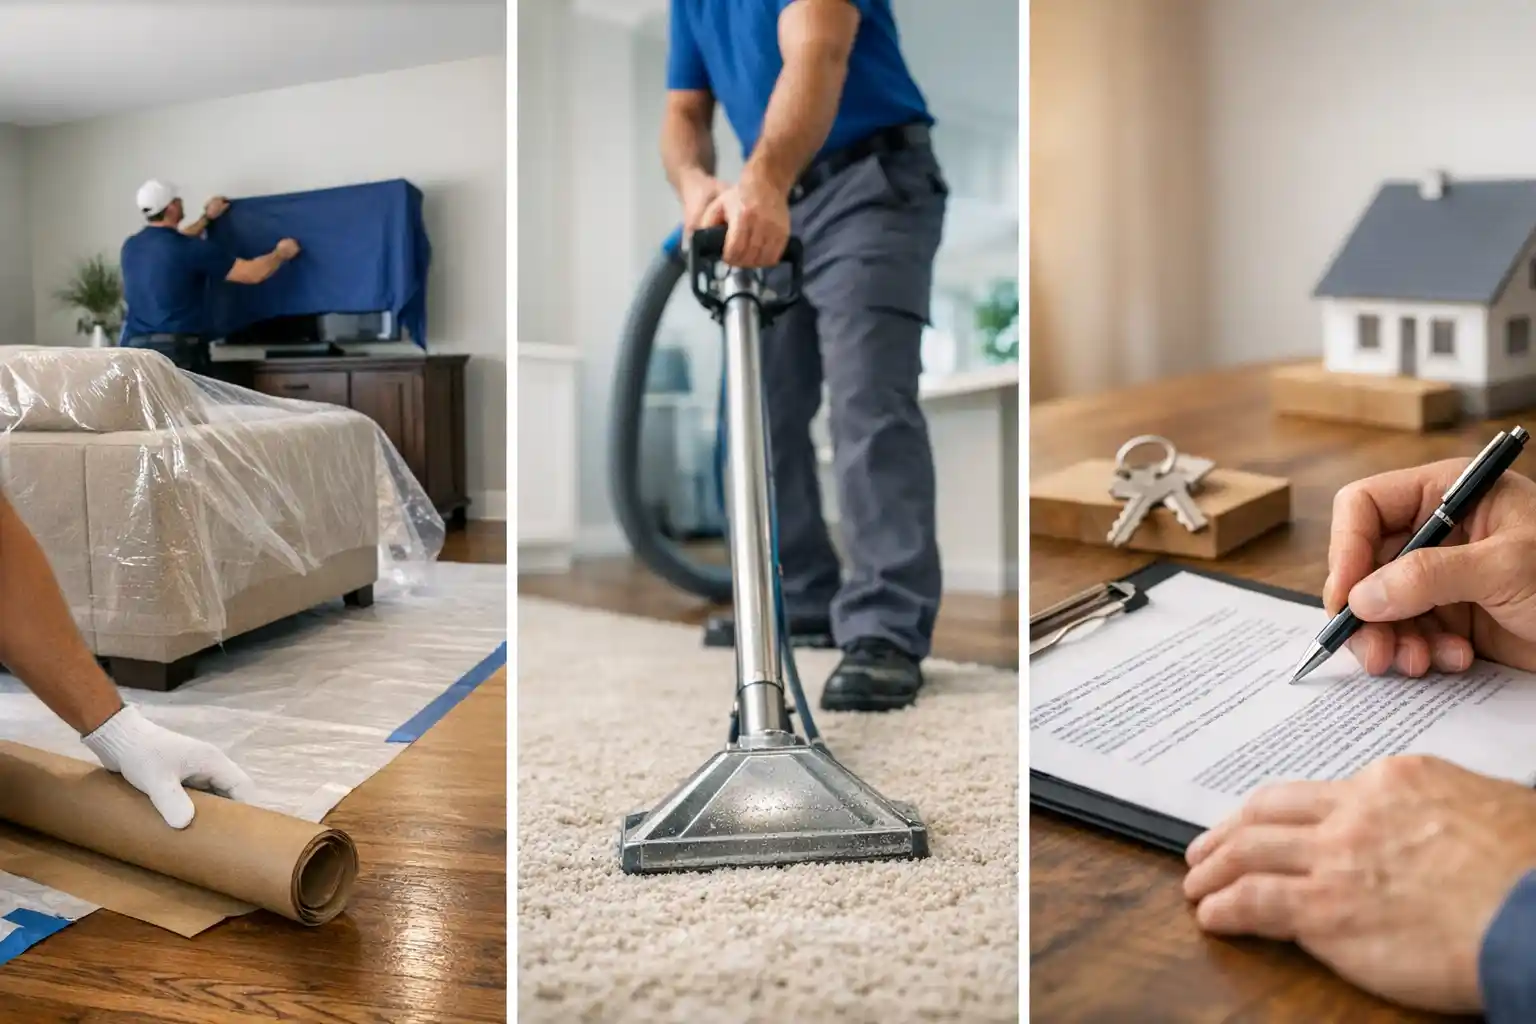
Protecting Your Investment: Materials, Cleanliness, and Warranty Assurance
Selecting Low-VOC and Durable Products
Always opt for professional-grade, low-VOC paints and stains for interior work—especially in family homes with pets, children, and high traffic on stairs, risers, wood floor areas, and adjacent trim or doors. These products provide stronger adhesion, less odor, and fewer health concerns. High-durability semi gloss finishes reduce the need for frequent touch-ups and stand up to years of wear on treads, landing edges, and carpet runner borders. Never cut corners with low-grade, high-odor products—any savings will be lost to rework, repairs, and potential warranty issues on your entire staircase.
Why Cleanliness and Masking Aren’t Negotiable
Dust, pet hair, and residue are the enemies of a perfect finish. Each surface—walls, wood, floor, doors, and trim—must be cleaned, masked, and covered before any coat is applied. Professional crews use tack cloth, precision masking with painter's tape, and overlapping drop cloths to shield every inch from cross-contamination, whether you have hardwood floors, carpet runner transitions, or painted white woodwork. Cleaning between steps and before each coat, using lint free cloth, guarantees that no sanding dust or dog hair are trapped beneath your finish.
Internal Link: Our Five-Year Workmanship Warranty
Your project is protected beyond the last coat. Read more about our five-year workmanship warranty and craftsmanship standards here—our protocols ensure your wood, floor, doors, trim, and walls hold up beautifully.
Quick Tips: The right prep, setup, and products aren’t extras—they’re essential steps that separate a professional finish from a weekend project result. Insist on seeing all materials (including masking supplies) before work begins.
Sequencing for Occupied Homes: Safety, Accessibility, and Minimal Disruption
Maintaining Access and Reducing Fumes
Homeowners need safe access during all phases. We develop a schedule that gives drying and curing times, allowing limited but safe use of the staircase between coats. For interior jobs, select low-odor, low-fume products and leverage modern ventilation techniques to keep the house livable. Protective coverings, like taped drop cloths or masking runners, help families walk safely while drying and staging occurs. Communication is key—families know when to walk and when to wait, and every step is explained from covering hardwood floors to applying semi gloss trim paint.
Communicating the Timeline and Next Steps
We’re clear and upfront about schedules—and revise timelines if weather, humidity, or unexpected details arise. Safety, clear walkways, and keeping rooms sealed off from sanding dust are non-negotiables. Clients are kept fully informed, so there are no surprises at any step, even when complex transitions between carpet runners, doors, or adjacent rooms extend the process. Every detail, from how to gently remove painter’s tape to when to lay drop cloths for the next coat, is covered in our project plans.
Honest Scheduling for Real Families
We stake our reputation on timely, realistic appointments—just read our customer reviews for details on how we deliver the right process for your house, interior, and family routine.
Quick Tips: The right crew will put family safety and access first. If your contractor can’t explain their approach, it’s time to find another who can guarantee all the details: from safe walking paths to precise masking on floors and stairs.
Common Pitfalls and How to Avoid Them

Mistakes that Lead to Rework or Extra Costs
- Painting over dust or pet hair—leading to peeling, visible debris, or a rough final coat
- Staining before walls—resulting in paint splatters or sanding dust on finished treads and risers, requiring extensive rework
- Insufficient drying times—causing tacky or cloudy finishes, sticking shoes, or failed adhesion (especially on stairs, around doors and adjacent trim)
- Poor masking—leaving edges rough, forcing costly repairs to both hardwood floors and carpet runner edges, and often sending more dust into the process
Lessons Learned from Real Projects
At Cover Pro Painting, we’ve seen every misstep imaginable. The biggest risk is skipping the details—whether it’s sanding too fast, not masking floors, or using the wrong type of stain or sealer. Trust the process, prioritize cleanliness with tack cloths and lint free cloth, and choose a team with a track record for craftsmanship, not shortcuts. Always allow proper drying times, especially in homes where interior humidity varies day-to-day, and protect all traffic zones, including the entire staircase and any place families or pets walk regularly.
What to Watch for with New and Old Construction
Old homes bring extra challenges—think uneven surfaces, hidden repairs, or past DIY attempts. Uneven wood floor, painted white stairs, or historic trim can take longer to tape and mask, so allow extra time to do all the details perfectly. New construction can fool homeowners into fast progress before surfaces fully cure. Always respect the interior conditions—whether it’s freshly installed bare wood, hardwood floors covered in sanding dust, or doors hung without protective coverings—and trust your craftspeople’s guidance for each other step of the process.
Quick Tips: Spend an extra 30 minutes masking and prepping at every stage. You’ll save hours—and often hundreds of dollars—in repairs and rework later on trim, wood, paint, and stain.
Choosing the Right Contractor: Questions to Ask Before Starting
Licensing, Insurance, and Credentials
Before anyone starts work on your house, ask for proof of licensing, bonding, and insurance. This protects your project and guarantees a standard of professionalism. Don’t just trust word of mouth—verify it. Also inquire about the brands and types of products used: ask for semi gloss durability on trim, certified low-VOC options for interior walls and stairs, and details on curing/drying times for each coat. Discuss all masking, prep, and protective coverings for hardwood floors, carpet, and doors before the project begins.
Why You Want a Pro with Local Experience
Every house is unique, but interior climate, wood species, and family schedules are remarkably similar across regions. You need a contractor who understands masking, sequencing, and material selection for your local environment—and who stands behind their work after the last invoice is paid. Look for a team fluent in dust control, sanding, and proper application for every final coat, from wood floor to stair treads, risers, and trim on interior doors.
Internal Linking: About Cover Pro Painting
Want to know our history and see the professionals behind every job? Learn more about Cover Pro Painting and our team here.
Quick Tips: The right contractor will share their plan, their products, and their credentials—no runaround, just good, straightforward answers with details about all protective measures for your wood, trim, floors, and walls.
Conclusion: Sequencing for Success in Your Home
Key Takeaways for Homeowners
- Always paint walls before staining stairs for long-term protection and quality in every interior.
- Mask every surface and clean thoroughly with lint free cloth and tack cloth to prevent sanding dust and pet hair from ruining your finish. Use drop cloths on all wood floors and stairs.
- Allow proper drying times and use low-VOC, durable products for a lasting interior finish. Never skip a coat or sand between layers.
- Trust experienced, licensed professionals who offer clear timelines, documented warranties, and respect your daily routines. Insist on all details being covered, from floor guys prepping hardwood floors to painters taping every edge and corner.
Free Consultations and Honest Painting Advice
Your home deserves every detail done right—from the first coat to the final walkthrough. Got questions about sequence, surfaces, or materials? Contact Cover Pro Painting for a clear, honest consultation that covers all masking, prepping, and finish options for your house, floors, and stairs.
Contact Cover Pro Painting
For more FAQs, tips, and expert insight, visit our blog for authoritative home painting guides, including guides on protective coverings, Sanding dust management, and choosing between semi gloss and other finishes for your interior doors, trim, and floors.
Frequently Asked Questions
What happens if you stain stairs before painting the walls?
Staining stairs first can make it harder to protect the wood from paint splatters and may require extra masking or repairs—especially if you’re working around drying times in our damp climate. Sanding dust or paint can ruin the finish on treads or risers, requiring a full sand and new coat of stain for the entire staircase.
How do you keep dust from sanding stairs off your freshly painted walls?
We use professional masking products, floor-to-ceiling plastic, and dust extraction tools. Protective coverings and overlapping drop cloths on wood floor and carpet runners help keep sanding dust contained. In Puget Sound homes, extra steps may be needed due to indoor humidity and limited ventilation. Always wipe surfaces with a tack cloth and inspect for dog hair before proceeding to the next coat.
Are new fast-drying or low-odor paint and stain products worth it?
Many new products can reduce project time and fumes—great for occupied homes—but proper prep, dust removal, and sequencing are still key to a lasting interior finish. Always test products on spare wood and be mindful of drying times between each coat and step.
Can you live in your home during stair and wall work?
Usually yes, with planning. We schedule phases to allow for access and minimal disruption—and always talk families through what to expect. Protective coverings allow safe walkways; low-fume materials and detailed cleaning routines keep air and surfaces safe in all parts of your house.
What if there’s damage after the work is done?
We stand behind our work with a five-year warranty and transparent repair protocol. If a mistake happens, we make it right—period. Issues like peeling coats, sanding dust under the finish, or overlap between paint and stain are covered in your warranty on the entire staircase, wood floors, and interior trim.
How does Cover Pro Painting sequence wall and stair jobs?
We paint walls first, using high-quality masking to fully protect stair woodwork, treads, risers, hardwood floors, doors, and trim before applying stain—protecting both the home and your investment at every stage. This ensures proper drying times and minimizes rework or dust-related mistakes across all steps of the interior process.